Nectus installation

How to Create a Maintenance Events in Nectus

, ,

How to Create a Maintenance Events in Nectus

You can create maintenance events in Nectus to allow everybody to see that specific objects (Interface, Device or Site) have an active or scheduled maintenance.

During active maintenance events corresponding objects in Nectus are displayed with a blue status icon.

This article shows how to create a maintenance event for a Device.

Similar process can be used for creation of Interface or Site level maintenance events.

Step 1: Login to the Nectus Portal, Right click on the specific device and select the Properties option.

A screenshot of a computer

Description automatically generated


Step 2: Go to the Maintenance Events Tab and Click on Add button to create a new Maintenance Event

A screenshot of a computer

Description automatically generated

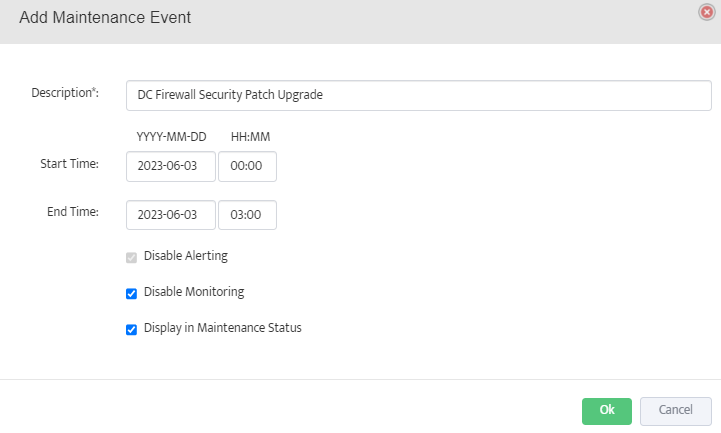
Step 3: Provide the suitable description and scheduling information.

Select the appropriate checkbox to disable monitoring or alerting during the activity time.


Step 4: We can also use the status, time range, objects type dropdown to filter the maintenance events to manage it.

A screenshot of a computer

Description automatically generated with medium confidence


Step 5. To See Complete list of all Maintenance events, go to Monitoring -> Global Monitoring Settings -> Maintenance Events.

A screenshot of a computer

Description automatically generated


Nectus SAML Integration

,


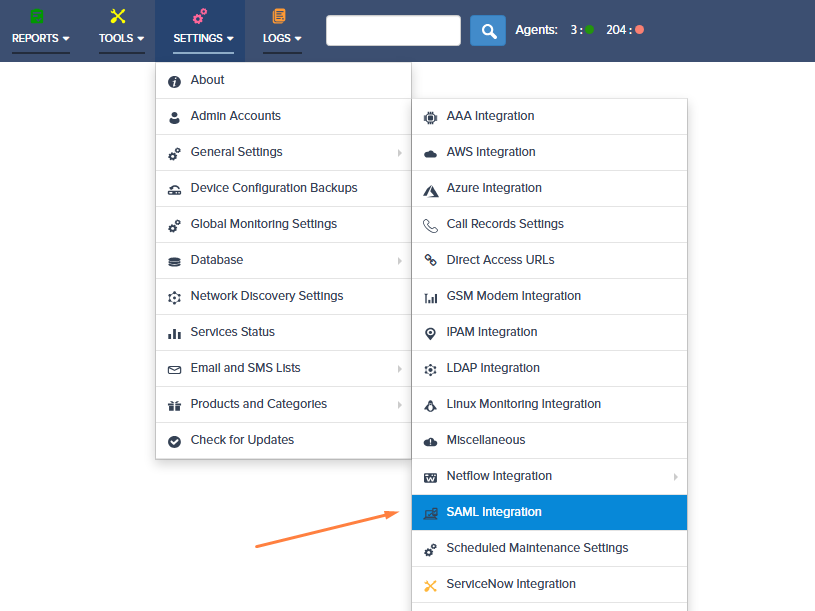
Step 1: Log in to the Nectus Portal and go to Settings > General Settings > SAML Integration.

Graphical user interface, text, application

Description automatically generated

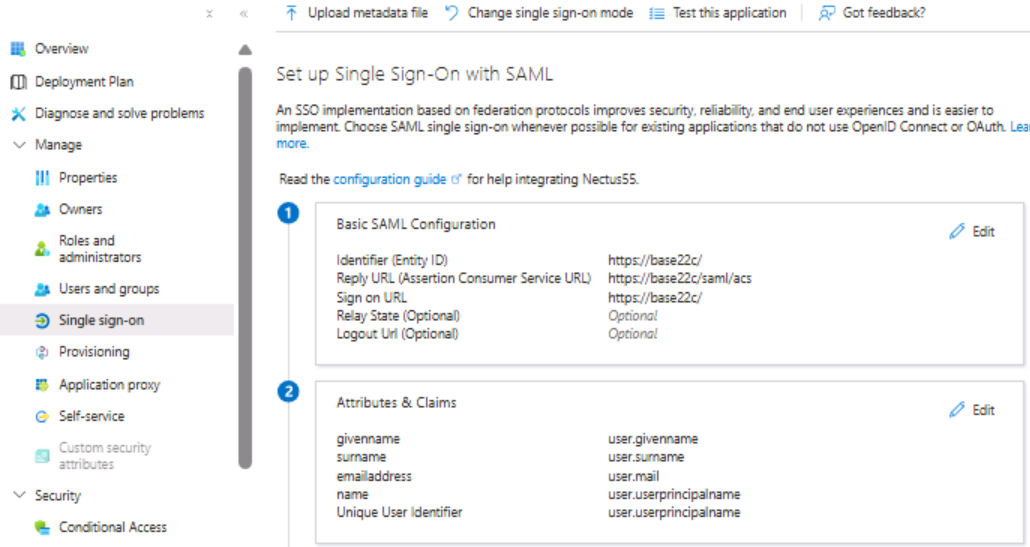
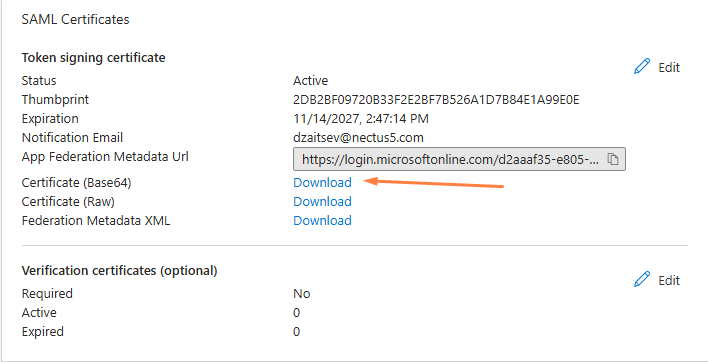
Step 2: In the SAML Integration Modal, under the General tab, provide the Entity ID, SSO URL and SLO URL, Certificate, Organization URL and API token.

Refer to SAML provider documentation on how to generate Certificate and API key.

Graphical user interface, text, application, email

Description automatically generated

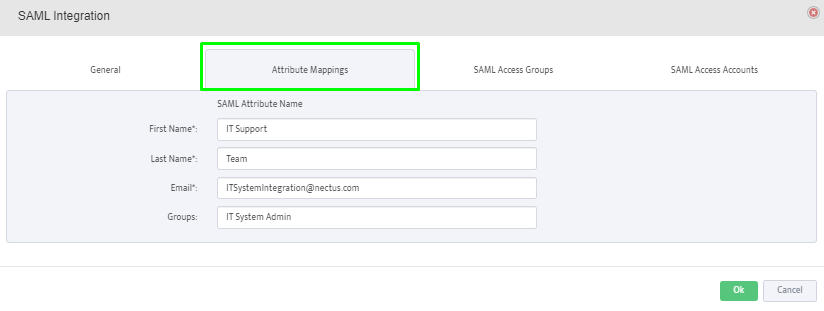
Step 3: Under Attribute Mappings, provide the SAML attributes for First Name, Last Name, Email and membership Groups.

This mapping is between SAML attributes and Nectus fields.
Graphical user interface, text, application

Description automatically generated

Step 4: Click on the “+” button to add the SAML user groups from the SAML Server.

Members of the selected groups will be allowed to login to Nectus.

Graphical user interface, application

Description automatically generated

Application

Description automatically generated with low confidence

Step 5: Click on the “+” button to add individual user accounts from the SAML Server.

Selected users will be allowed to login to Nectus.

Graphical user interface, application

Description automatically generated

Application

Description automatically generated with low confidence


How to Manually Add Device Classification for Unknown Devices

, ,

How to Manually Add Device Classification for Unknown Devices

Step 1:

Nectus maintains internal device classification database where each device is assigned a major platform category and a device model name.

Classification is associated with device SNMP Platform OID: (.1.3.6.1.2.1.1.2.0)

Classification database is updated daily and support for new devices included in every Nectus update. But in some rare cases Nectus might not have classification info for specific device and this device will appear under “Unknow Category” in SNMP device tree.

Nectus GUI allows customer to manually add Unknown device classification information directly into Nectus server database.

Right-click on SNMP Platform ID value and select “Add Product Definition for x.x.x.x.x.x.x” from the SNMP Devices context menu.

Graphical user interface, text, application Description automatically generated

Step 2: As the product definition modal opens, provide the sub-category (product) name, and select a category from the drop-down menu. If there is no applicable category name in the drop-down menu, you can define a new category name.

Graphical user interface, application Description automatically generated


Controlling Nectus Database Size Growth with Data Retention Rules

, ,

Controlling Nectus Database Size with Data Retention Rules


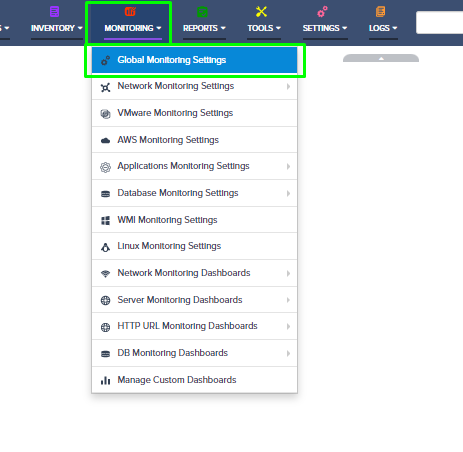
Step 1: Login to Nectus portal and go to Monitoring 🡪 Global Monitoring Settings option.

Graphical user interface, text, application

Description automatically generated

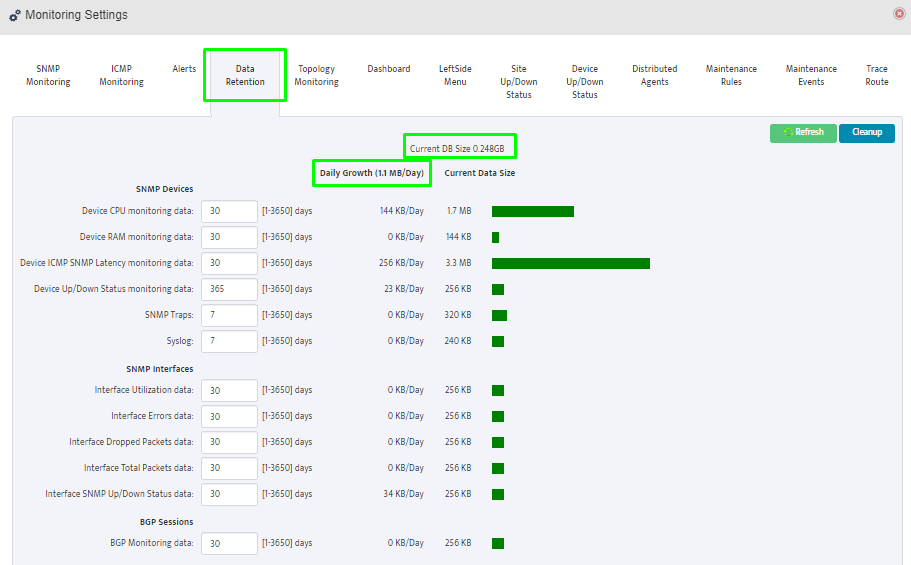
Step 2: Go to the “Data Retention” tab in the Monitoring Settings modal. It shows retention settings in days for each monitoring metric.

Further, it also shows the current database size and the data daily growth rate.

These two options give you a good idea of how to plan your retention period and storage requirements.


Graphical user interface, application, table, Excel

Description automatically generated


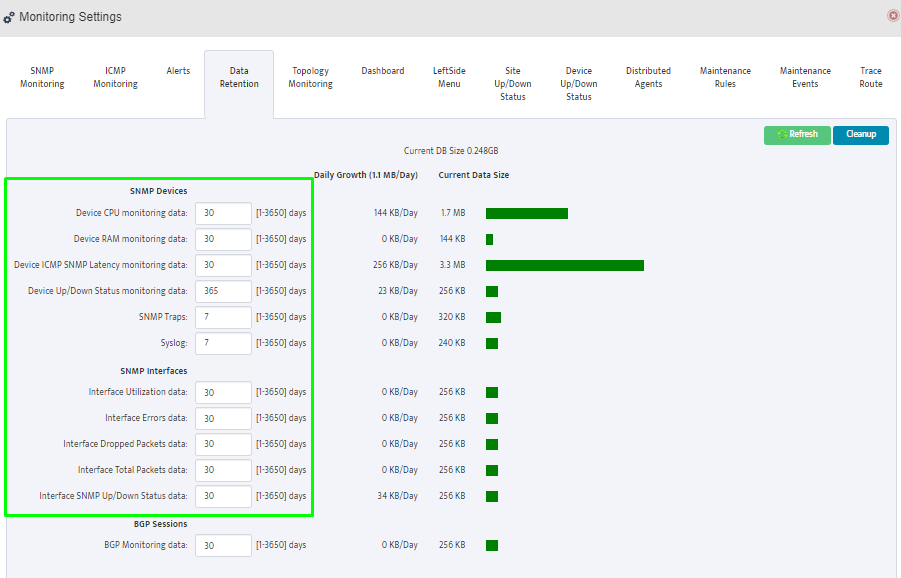
Step 3: Provide the retention period in days with maximum of 3650 days (10 years) and minimum of 1 day.

Graphical user interface, table

Description automatically generated


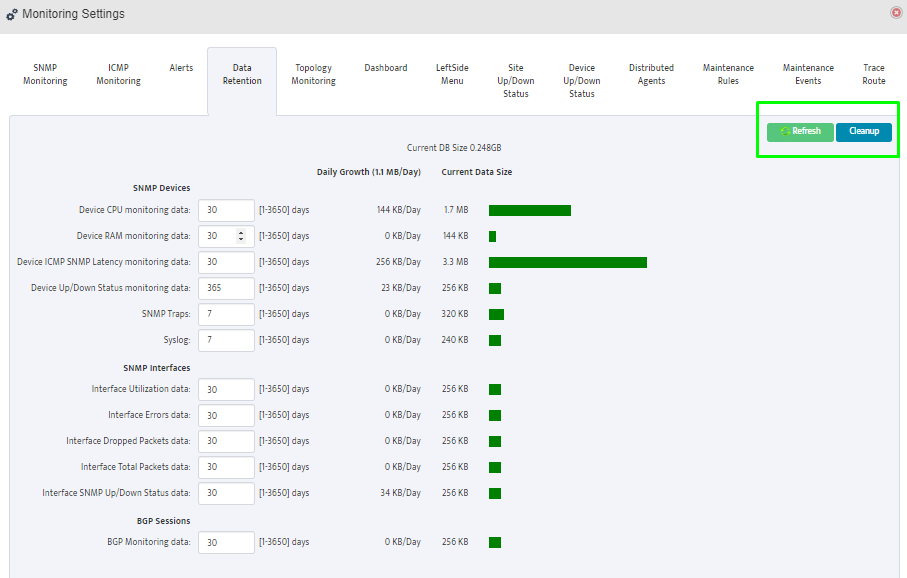
Step 4: We also have two key options such as Refresh and Cleanup.

Refresh – Will fetch updated size information from the server

Cleanup – Starts removal of monitoring data from the Nectus database according to retention settings.

Note: Normally Cleanup happens automatically every day at 2:00AM.

Graphical user interface, application

Description automatically generated


How to Control Logging in Nectus via .ini Files

,

How to Control Logging in Nectus via .ini Files

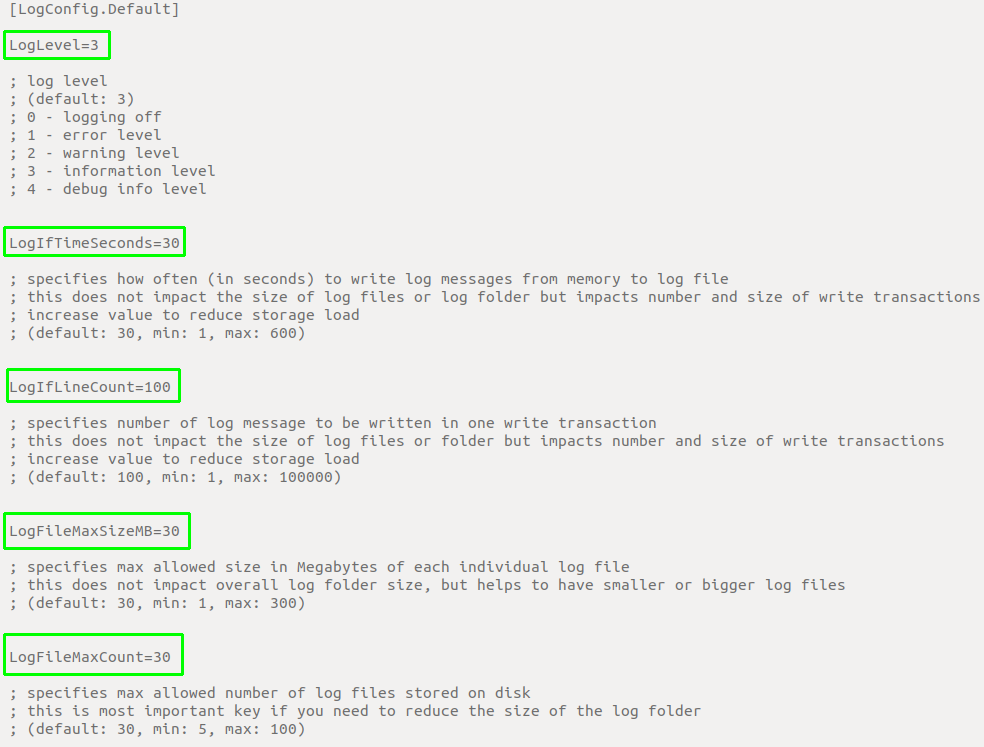
If there is a need to reduce amount of disk space Nectus Logs take you can adjust logging verbosity or disable logging completely for each Nectus Service.

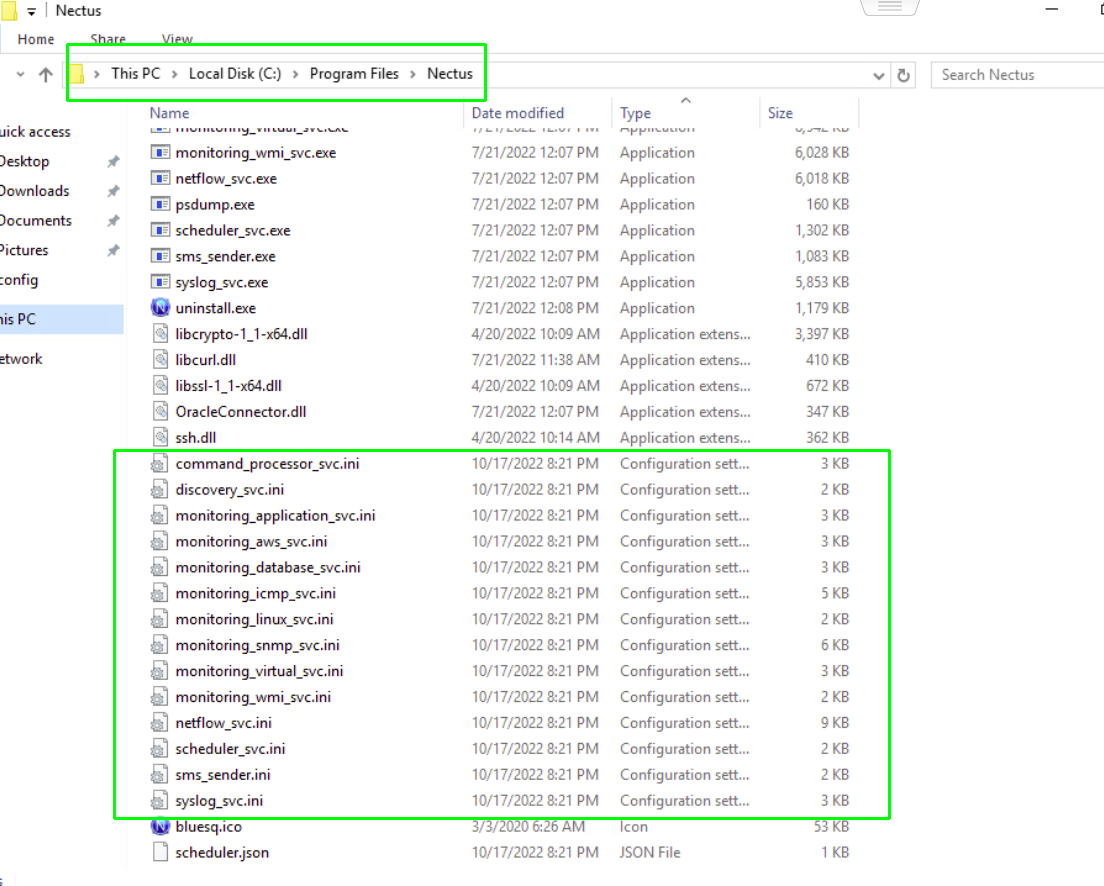
Logging settings for each service is controlled by .INI files located in C:\Program Files\Nectus\

Any changes to .INI files do require restart of the corresponding Nectus Service.

To adjust logging settings follow these steps


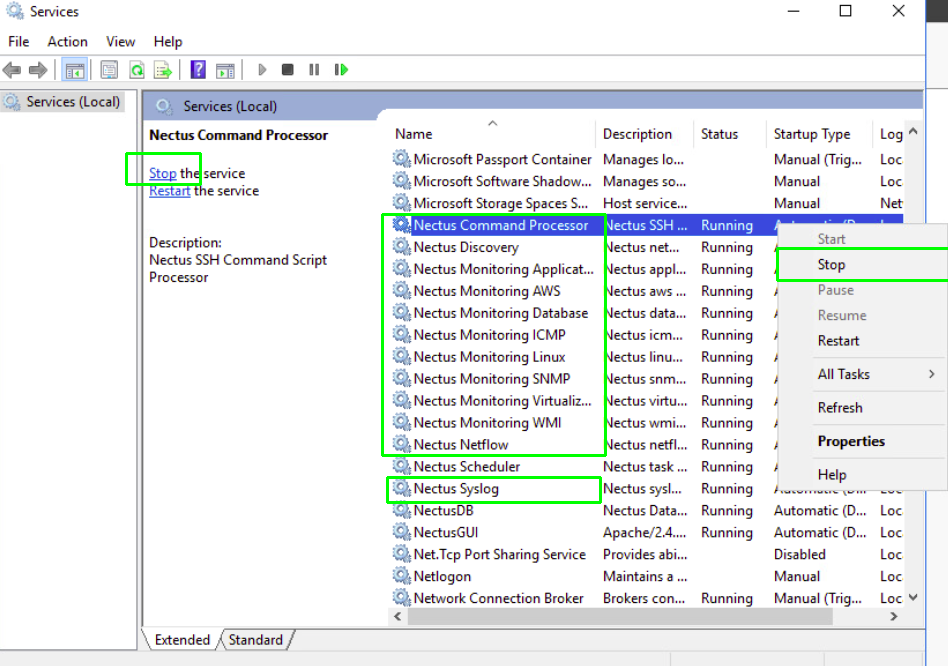
Step 1: Stop the required Nectus services on the server.


Step 2: Go to “C:\Program Files\Nectus” on the Nectus server.


Step 3: Update the logging configuration in corresponding .ini files located in “C:\Program Files\Nectus” as per the requirement and save them.


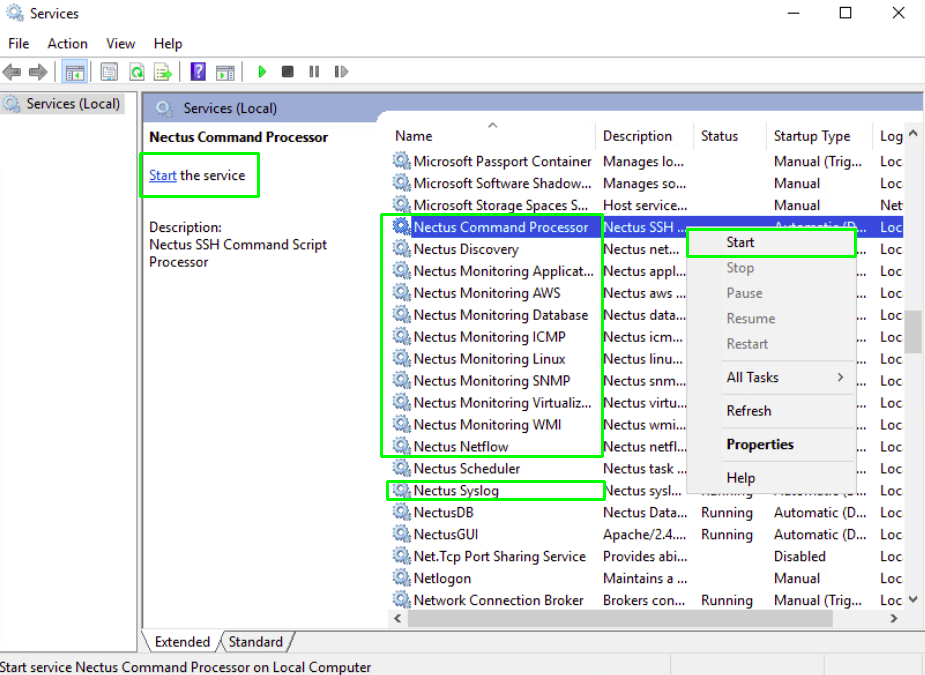
Step 4: Start all the Nectus services on the server.

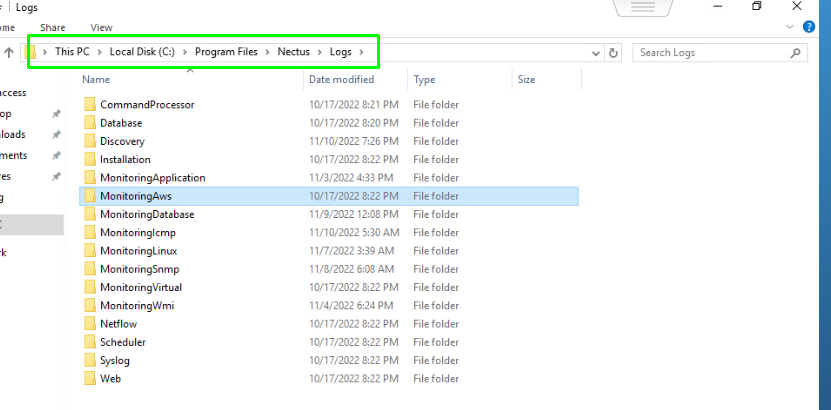
Step 5: To check the current size of log folders, navigate to “C:\Program Files\Nectus\Logs.”

Graphical user interface, application

Description automatically generated


Nectus DB Migration by manually copying DB files to a new server.

,

Nectus DB Migration by manually copying DB to a new server.

Step 1: Prepare new server by performing clean Nectus installation with the same Nectus version as on old server

Step 2: Stop all Nectus services on the new server

Graphical user interface, application

Description automatically generated

Step 3: Delete all the content from “C:\Program Files\Nectus\Database” folder on new server.

Step 4: Copy complete “C:\Program Files\Nectus\Database” folder from the old Nectus server to the “C:\Program Files\Nectus\Database” folder on the new server

Step 5: Copy file “C:\Program Files\Nectus\Web\Apache24\htdocs\protected\config\database.ini” from old server to the same location on new server.

(Overwrite existing file).


Step 6: In all *.ini files located in “C:\Program Files\Nectus” folder on new server update

DatabasePassword=wL1Kdnl6h$ line with a new password for username “vconsole” which can be found in

C:\Program Files\Nectus\Web\Apache24\htdocs\protected\config\database.ini” file.


Graphical user interface

Description automatically generated


Graphical user interface, text, application

Description automatically generated


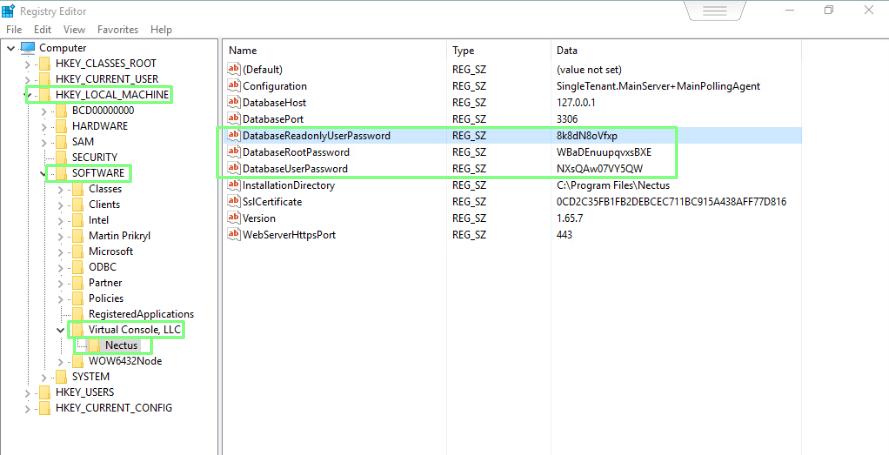
Step 7: Open the Registry Editor and in “HKEY_LOCAL_MACHINE -> SOFTWARE -> Virtual Console LLC -> Nectus

update passwords for the three database accounts. (New passwords can be found in database.ini file)


Graphical user interface, text

Description automatically generated

Step 8: Start all Nectus Services

Migration Complete.


Performing Nectus DB migration to a new server  with “DB Migration” tool

,

Performing Nectus DB migration to a new server  with “DB Migration” tool


DB Migration tool is only available to users with Super Admin rights.

Prepare new server with clean Nectus installation with the same Nectus version as on old server.

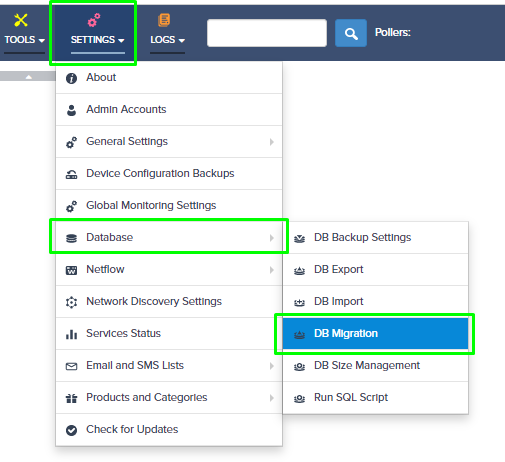
Step 1: Login to the old Nectus server and go to Settings -> Database -> DB Migration.


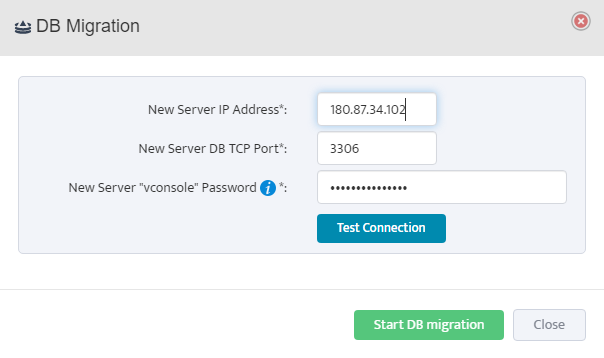
Step 2: In the DB Migration window specify IP address of the new server and password for “vconsole” DB account from the new server.

Note: Password for “vconsole” account can be found in the

C:\Program Files\Nectus\Web\Apache24\htdocs\protected\config\database.ini” file on the new server.


Graphical user interface, text, application, chat or text message

Description automatically generated


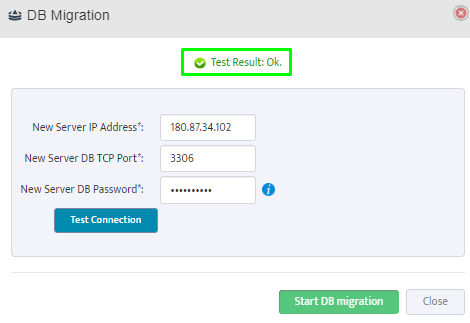
Step 3: Click on the Test Connection. It will perform the credentials and Nectus version checks.


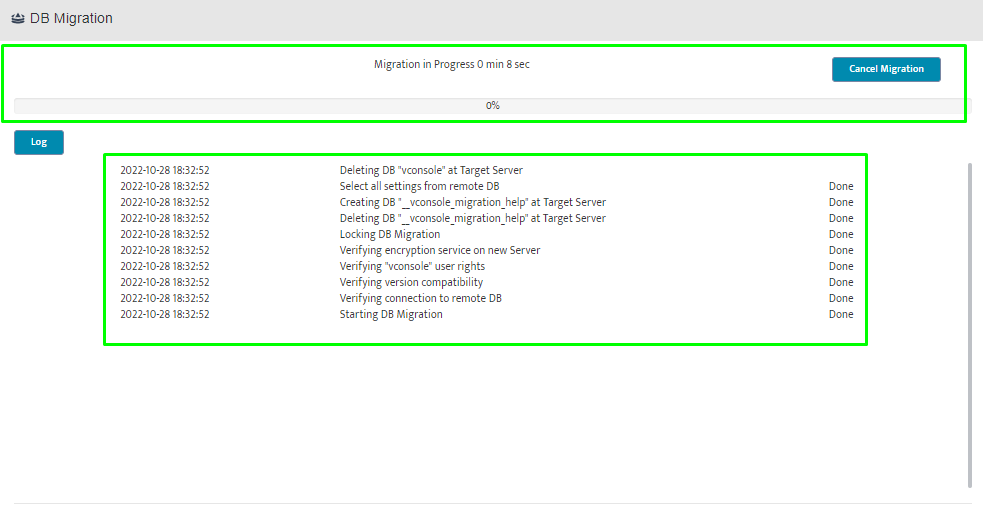
Step 4: Start migration by clicking on “Start DB migration”.


Depending on the database size migration may take several hours.


How to use Nectus API Interface

,

How to use Nectus API Interface

Quick Start Guide

Step 1: Log in to Nectus Portal. On the home page, select General Settings -> Miscellaneous.


Step 2: Next, we have to generate a new client ID and client secret for creating the token. Go to API Accounts and click on Create.


Step 3: Check the Enable box, enter the Client ID & Secret in the text box, and select the necessary access level (Read-Write or Read-Only) for the modules.

Here, we have given the Client ID as API_USER_1 and Client Secret as Nectus123. Click on the Ok button to create it.


Step 4: Each API Account with the Client’s information obtains a unique ID and gets listed.

We also have the Edit button to modify and the Delete button to remove the existing accounts with ID. Click on the Ok button to close the miscellaneous modal.


Step 5: Now, we have to create the API token with the help of the generated Client ID & Client Secret.

Here, we are using the POSTMAN Application for the sake of the demo. Use the below query and headers to get the access token.

API URL: https://<servername>/token/get

Request Type: GET

Headers: Authorization – client_id=API_USER_1 client_secret=Nectus123


Step 6: Click the Send button to obtain the Status Code with 200 Ok with the token details in the response body.


Step 7: Now, we can use the generated access token for all Nectus API’s.

Let’s try with some API Request.

API URL: https://<servername>/IPMonitor/restAPI/getStatusIPv4Monitor

Request Type: GET

Headers: Authorization – token=<generated-access-token>

After clicking the Send button, we obtain the list of IPv4Monitor groups with the associated IP address and status.

Congrats! We have successfully used the Nectus API interface to access the monitoring data points which will ease the third-party integration with other systems.


How to Perform Nectus Software Upgrade

,


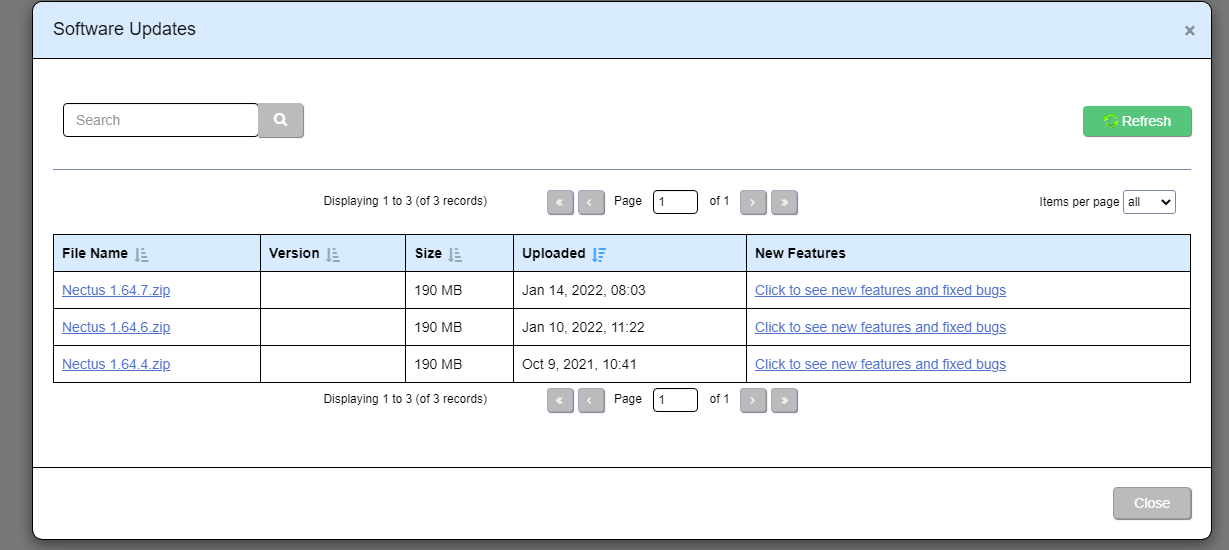
Step 1. Download latest Nectus release from Nectus Support Portal (https://support.nectus5.com)

Table

Description automatically generated


Step 2.    Unzip Nectus distribution archive Nectus xxxxx.zip to any folder on Nectus Server.


For upgrade you should have two files:

Graphical user interface, text, application

Description automatically generated


Step 3. Right-click on “Nectus Setup” and select “Run as administrator”.


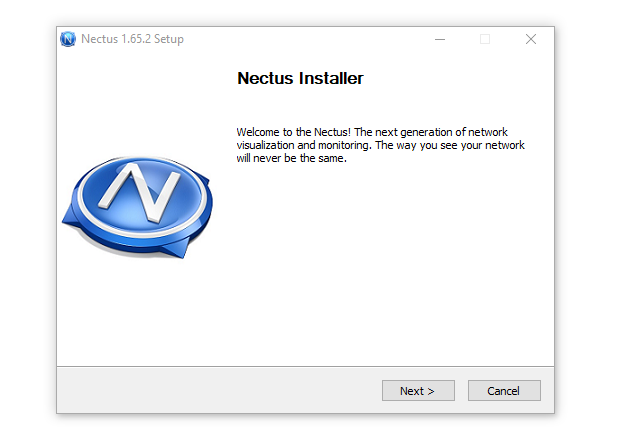
Step 4. The Nectus Installer window opens. Click Next.


Graphical user interface, text, application, Word

Description automatically generated


Step 5. The License Agreement window opens. Click “I Agree”.


Step 6. The Upgrade window opens. Select the “Upgrade” mode.


Note: “Upgrade” mode (the default mode) preserves the database and all data in it.
!!! “Remove” mode will delete the existing database and all data will be erased!!!!

Click “Install”.


Step 7. The installation begins by saving resources.


Step 8. The old software components are uninstalled.

If desired, click on “Show details”.


Step 9. Show details lists the steps the installer is performing.


Step 10. When the old software components have been removed, the new version will be installed.


Step 11. The installation completes. Click Next.


Step 12. The “Completing Setup” window opens.


How to Control Access Rights to Network Devices in Nectus

, ,

In this article, we will show how to control the access rights to specific network devices visible in Nectus.
We will create a user group “Texas Admins” that have access only to specific subset of SNMP devices “Texas Network Devices” in Nectus database.

Step 1.  Create a custom SNMP device view “Texas Network Devices” in Inventory -> Views -> SNMP Device Views

Step 2. The SNMP Devices Views window opens. Click on Create.

Step 3. The Add SNMP Devices View window opens. Give the view a name “Texas Network Devices”.

Select desired devices in the window on the right (Available SNMP devices).

When all are selected, click on the Left Arrow key to move the selected devices from the Available window to the Selected window.

We selected nine devices.

Step 4. Selected devices move into the Selected SNMP Devices window. Click Save.


Step 5. Looking in the SNMP Devices Views window, we see that the view “Texas Network Devices” has been created and has nine devices.


Step 6. Create Admin User group “Texas Admins”  in Settings->  Admin Accounts


.


Step 7. Navigate to Settings Admin Accounts.


Step 8. The Admin Accounts window opens. Select User Groups, and click Create.


Step 9. The Add Users Group window opens. Enter the Group Name (Texas Admins), select the Access Right (Read Only), click Views.


Step 10. Select desired View “Texas Network Devices” that members  of this Admin group can see.


Step 11. Click OK.

Step 12.  Create User in “Texas Admins” Group.

Step 13. In the Admin Accounts window, click on User List and click Create.

Step 14. The Add User Account window opens.

Fill in the fields (First Name, Last Name, Email/Username).

Create and confirm password. Assign to group (Texas Admins). Click OK.


Step 15. In Admin Accounts window, verify that new user (Mike Fletcher) now appears with Group Texas Admins.


Step 16. In the Admin Accounts window, click User Groups and click on Texas Admins.

Verify the assigned view for SNMP Devices Views is Texas Network Devices.


Step 17. Logout and log back in as Mike Fletcher.


In the Inventory window under SNMP Devices you should only see the 9 devices assigned to “Texas Network Devices”.


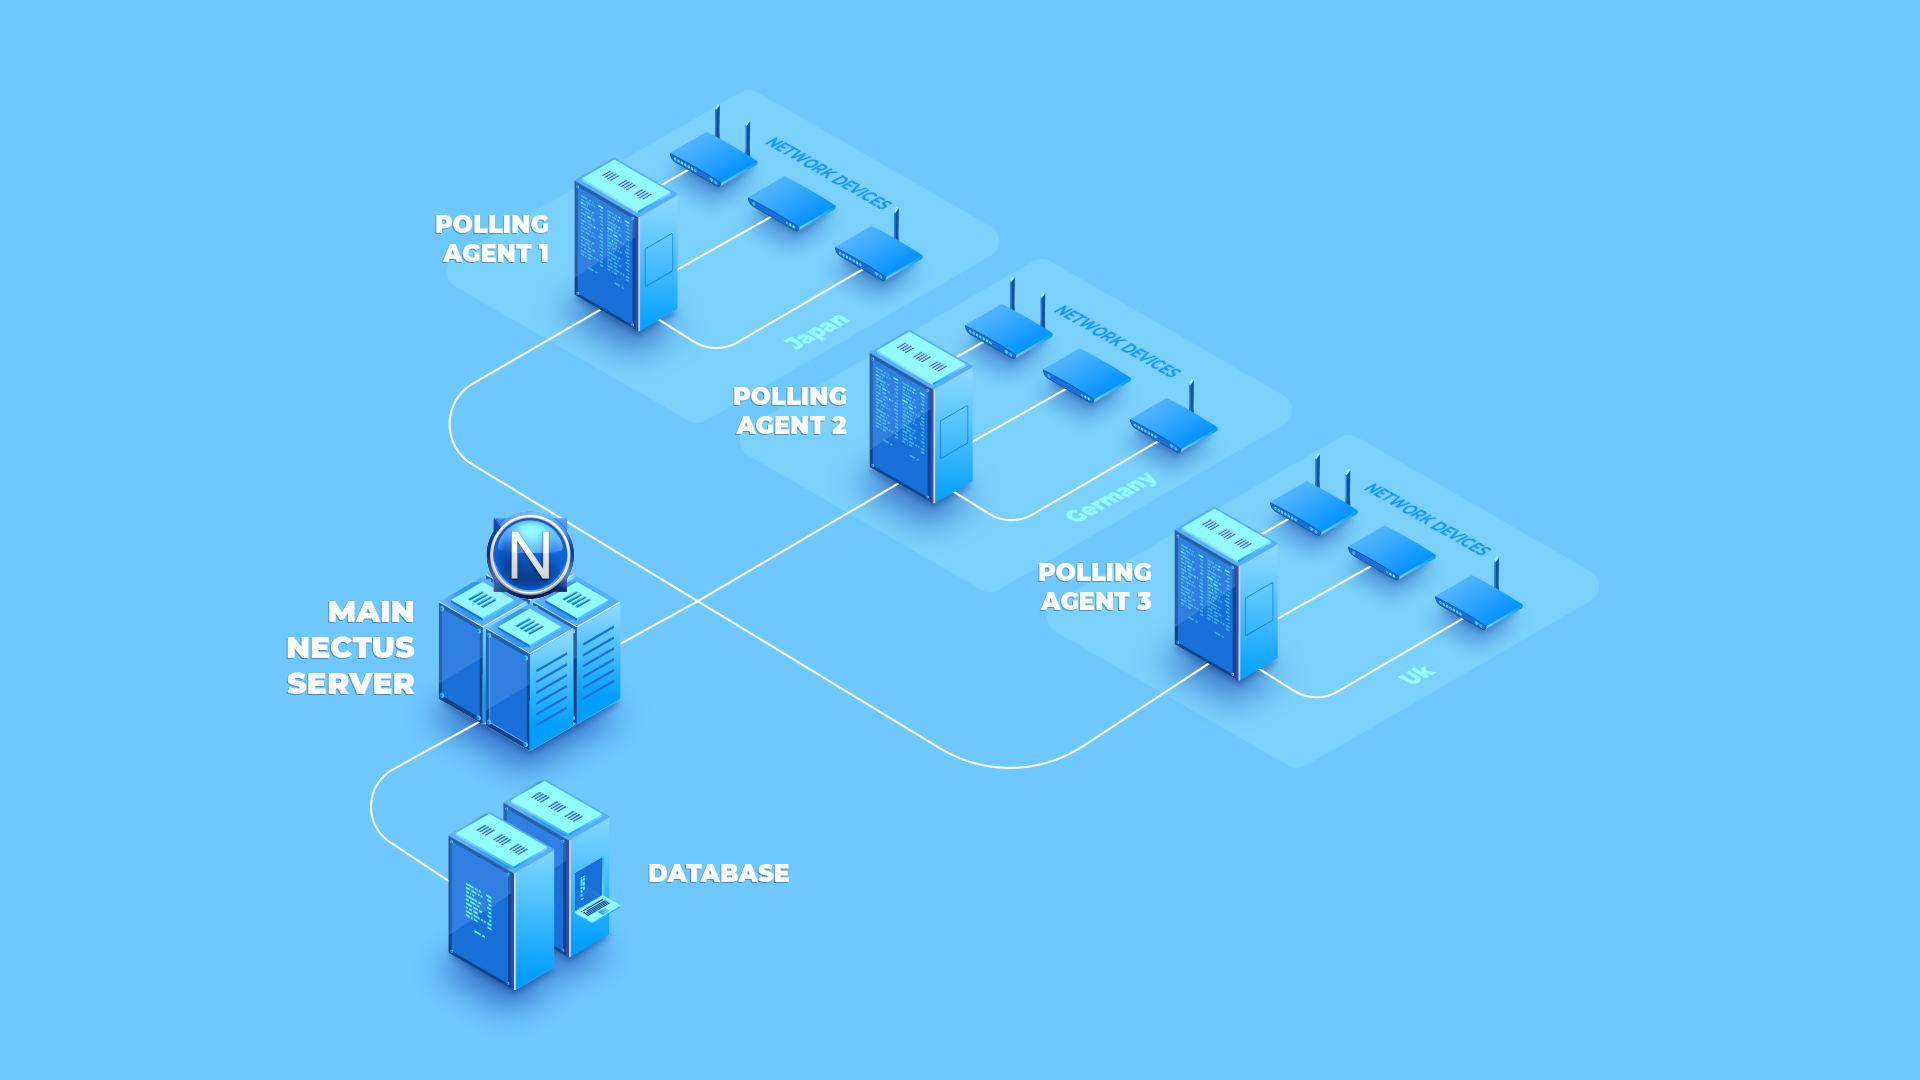
How to install additional polling agent

,

Step 1: Login to Nectus Portal in the home page. Select Settings -> Global Monitoring Settings.

Step 2: Next, select Distributed Agents to get the list of configured agents. Click on Create button to create a new poller agent.

]

Step 3: Now, provide a valid and unique name to the agent. Here, the Distributed Agent Name is “Regional USA Polling“. Select the enabled checkbox and click on Ok to create the poller object in the main server.

Note: Once the agent installation is complete, the RED changes to GREEN.

Additionally, the status of configured agent can also be checked on home page near the search icon.

Now, let’s start the installation on the Additional Polling Agent Server.

Step 4: After the download is complete, double click on the exe file. Installer window opens up. Click on Next to proceed with the installation.

Step 5: Go through the License Agreement carefully and then click on the Agree button.

Step 6: Select Additional Polling Agent in the Installation Type window and click on the Next button.

Step 7: Select the relevant options. Click on the Next button.

Step 8: Select the destination folder. Make sure, a minimum of 2GB of disk space is available in the selected drive. Click on the Next button.

Step 9: Next, provide the same name in the Additional Agent Name as in step 3. Fill the main polling agent IP address in the textbox and click on the Next button.

Step 10: Warning: Ensure that we open 10167 and 10168 ports between the new and main agent. If not, below error message will pop up.

Step 11: Then, key in a password to integrate the agent with the main server database.

Step 12: Log in to the main server and go to C:\Program Files\Nectus\Web\Apache24\htdocs\protected\config\ path and open database.ini file.

Step 13: Copy the password of vconsole username and paste it on the additional agent installer password textbox and click on the Install button.

Step 14: Once the installation completes, click on Next to proceed further.

Step 15: Finally, click on the Finish button and close the window.

As mentioned earlier, the additional poller status automatically converts to GREEN after successful installation.

Congrats! We have successfully installed the additional polling agent and integrated it with the main server.


How to install SSL Certificate for Nectus GUI

,

This guide explains how to generate the CSR code and install a commercial SSL certificate for Windows Apache so that you could access your Nectus GUI page securely via HTTPS.

It assumes that during Nectus installation, you selected the default location which is C:\Program Files\Nectus.
If you installed Nectus in a different folder, make sure to adjust the commands and locations given in this guide accordingly.

In general, in order to have a website accessible using secure HTTPS connection, the web server must have a pair of public and private keys configured.

The public key must be signed by a trusted Certificate Authority and added to a digital SSL certificate.

To obtain that certificate, you will need to send the certificate signing request (CSR) code to your SSL provider. Please refer to instructions below:


Generating CSR using OpenSSL

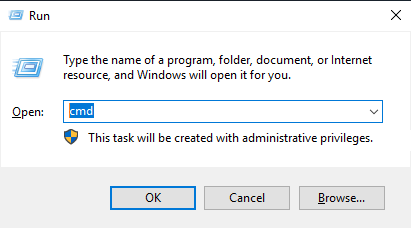
  1. On your Windows server, press Win+R, enter cmd and hit OK

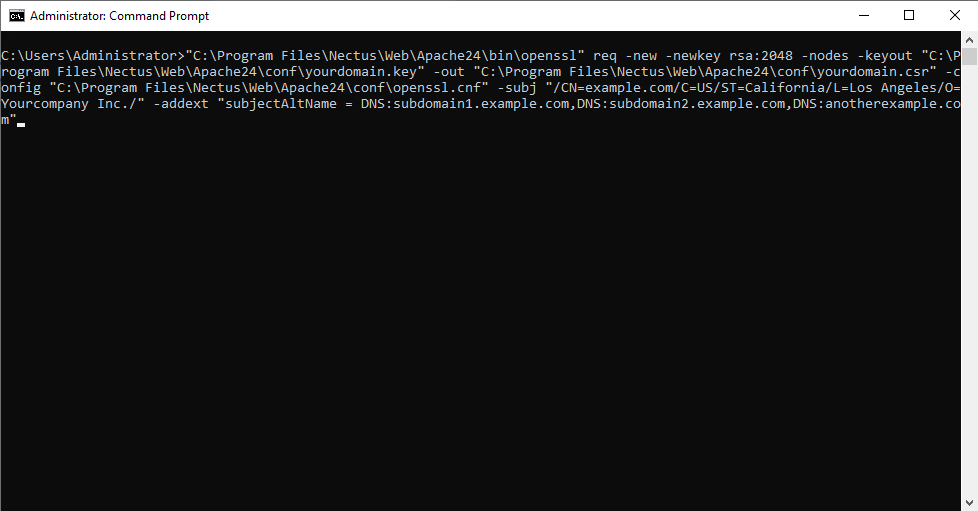
  1. Now you will need to run a certain OpenSSL command to generate a new CSR/Key pair for your future SSL certificate.
  2. The command template is below, make sure that you adjust the highlighted fields – they must be related to your system:

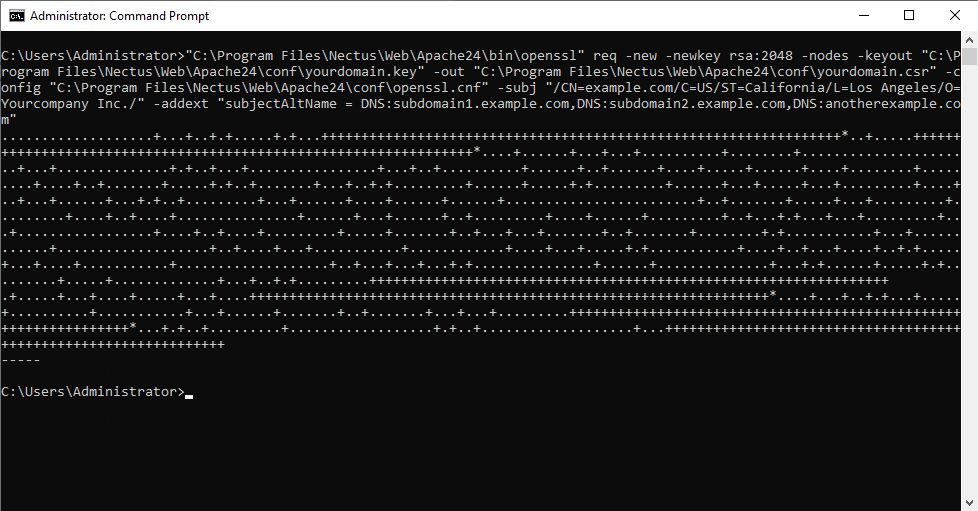
“C:\Program Files\Nectus\Web\Apache24\bin\openssl” req -new -newkey rsa:2048 -nodes -keyout “C:\Program Files\Nectus\Web\Apache24\conf\yourdomain.key” -out “C:\Program Files\Nectus\Web\Apache24\conf\yourdomain.csr” -config “C:\Program Files\Nectus\Web\Apache24\conf\openssl.cnf” -subj “/CN=example.com/C=US/ST=California/L=Los Angeles/O=Yourcompany Inc./” -addext “subjectAltName = DNS:subdomain1.example.com,DNS:subdomain2.example.com,DNS:anotherexample.com

Explanations for each field:

CN= this is the field for the primary domain of your SSL

C= enter the ISO 3166-2 compliant country code here

ST= the field for the state

L= the field for the city

O= the name of your company. If you do not have a company or do not wish to indicate it, simply put NA

DNS: additional domain names (also known as SANs – Subject Alternative Names) that should be included into the certificate;

you can include multiple SANs in the CSR code, however, double-check with your SSL provider whether your SSL certificate supports SANs.

  1. Executing the command should produce the following output:

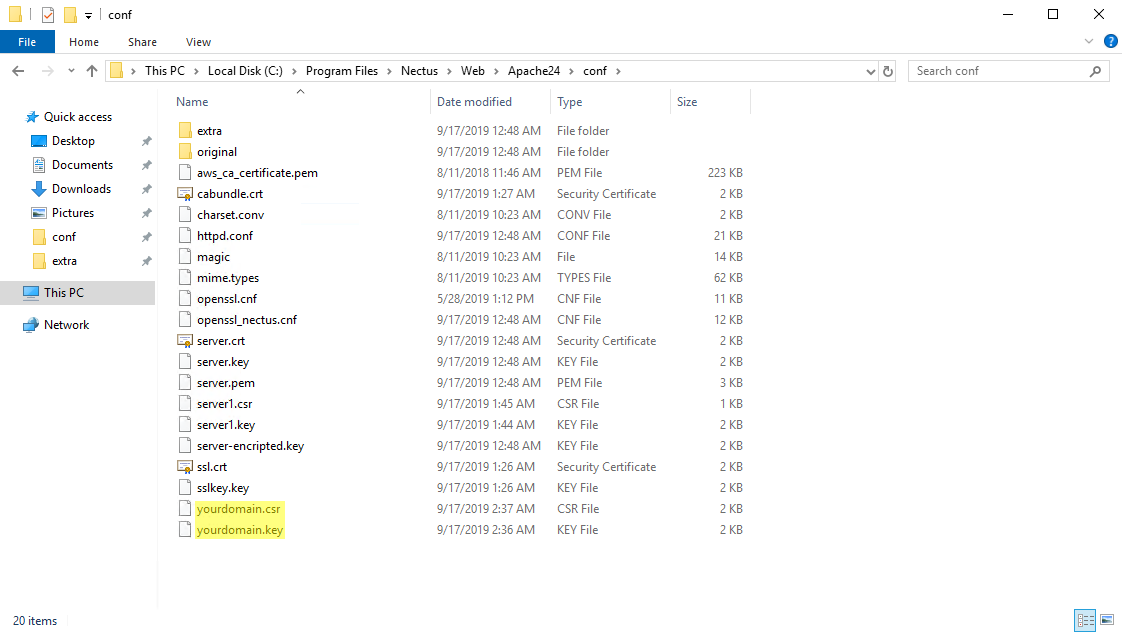
Once done, the C:\Program Files\Nectus\Web\Apache24\conf\ directory will have two new files, the file with the CSR code (.csr) and the file with the private key (.key).

We’ll leave the private key for the time being. The CSR code has to be provided to your certificate vendor — this code is the base for your commercial SSL certificate.

Please contact your SSL vendor regarding SSL certificate purchase.


When the SSL is issued, you should receive at least two files: SSL certificate in a .crt (or .pem, .cer) file, and the CA-bundle (also can be called intermediate CA, root CA certificates)

with extensions like .ca-bundle, .crt. Please note that Apache requires only PEM-encoded certificates, so PKCS#7 or PKCS#12 encoded SSLs won’t work.

Configuring SSL for Apache

  1. Upload those files to the C:\Program Files\Nectus\Web\Apache24\conf\ directory.
  2. Then, go to the C:\Program Files\Nectus\Web\Apache24\conf\extra folder, and open the httpd-ssl.conf file in Notepad.
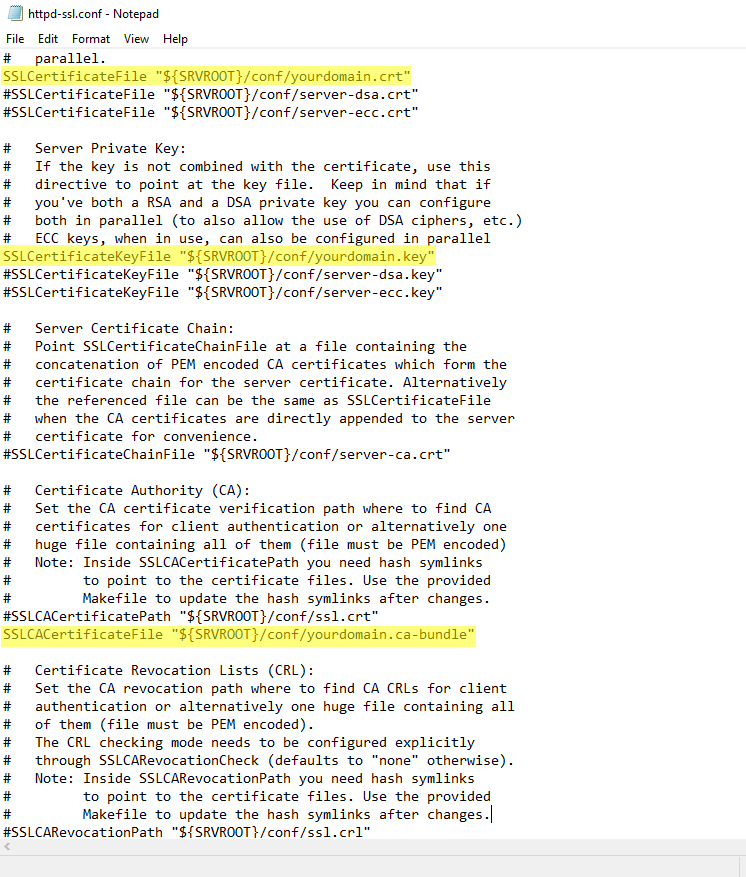
  3. Find and edit the following directives and make sure that they point to the SSL certificate, Private Key, and the CA-bundle files accordingly:

SSLCertificateFile “${SRVROOT}/conf/yourdomain.crt”

SSLCertificateKeyFile “${SRVROOT}/conf/yourdomain.key”

SSLCACertificateFile “${SRVROOT}/conf/yourdomain.ca-bundle”

Note that the SSLCACertificateFile directive is commented out by default.

You need to delete the # sign at the beginning of the string to uncomment the directive.

  1. Save the configuration file
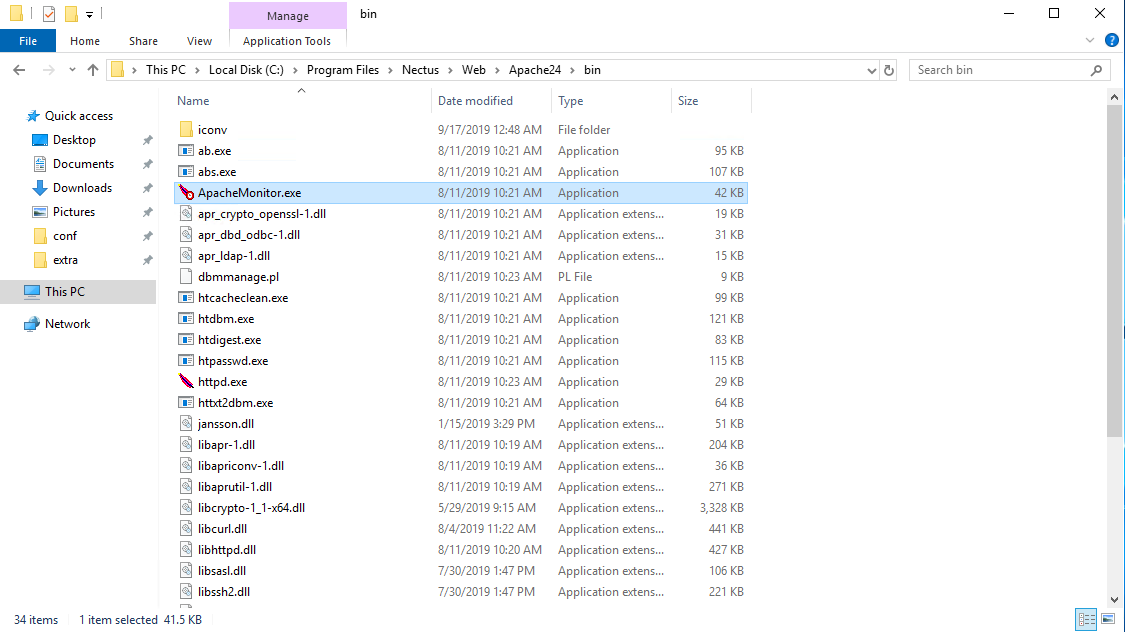
  2. Return back to the C:\Program Files\Nectus\Web\Apache24\bin folder and double-click on ApacheMonitor.exe

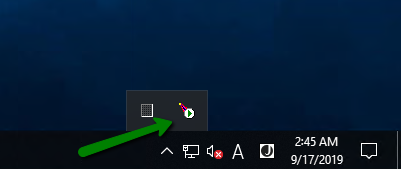
  1. The ApacheMonitor app will appear in the system tray at the lower right corner of your screen. Find and click it there.

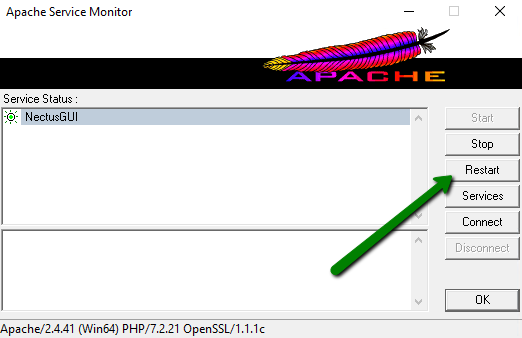
  1. Hit “Restart”

  1. Now you can try accessing your Nectus GUI page in the browser via HTTPS: https://yourdomain.com


Device View Auto Population Rules

, ,

Device View Auto Population Rules

Device View is the logical grouping of the devices that can be used in different places within the Nectus application. In the previous versions of Nectus, the user would manually add devices into device views which may become a significant management overhead.

In Nectus version 1.55 we introduced an ability to automatically populate device views based on specific conditions such as device names, types, etc.

User can define a set of conditions which has to be true for Nectus to automatically add devices to device views.

This article will guide you through the process of defining the auto population rules for device views.

To access your SNMP Device Views go to Inventory Views SNMP Device View


To add a new Device View, click Create in the upper right hand corner of the SNMP Devices Views page.


Give a name to your new Device View.


.

Press Save button to finish creation of Device view.


Open again newly created device view and in the upper right-hand corner, select Edit Rules.

This will open the Devices View Auto Population Rules page.


Select the plus sign to add a new Auto Population Rule.


Add all the required Auto-population rules and press Ok button to Save.

If multiple rules are defined all the rules must be TRUE for device to be automatically added. (Logical AND).

Your rules will be processed daily at 3:00 PM.

If you would like to apply your rules immediately, press the Apply Rules button.


ClickHouse DB Installation for Nectus Netflow & Syslog Storage

, ,

Requirements:  Operating System: Ubuntu 22.04.1 LTS       RAM: 16GB   vCPU: 2

More information about installation: https://clickhouse.com/docs/en/install/#self-managed-install

Step 1

Open terminal and install required packages:

sudo apt-get update
sudo apt-get install -y apt-transport-https ca-certificates dirmngr

Step 2

Import the ClickHouse public key:

sudo apt-key adv –keyserver hkp://keyserver.ubuntu.com:80 –recv 8919F6BD2B48D754

NOTE: It is recommended to import the public key if it’s a fresh Ubuntu install.

Otherwise, you may get the following error when adding the repository:

GPG error: http://repo.clickhouse.com/deb/stable/main/release:
The following signatures couldn’t be verified because the public key is not available:

NO_PUBKEY 8919F6BD2B48D754

Step 3

Add ClickHouse repository:

echo “deb https://packages.clickhouse.com/deb stable main” | sudo tee \
/etc/apt/sources.list.d/clickhouse.list

Step 4

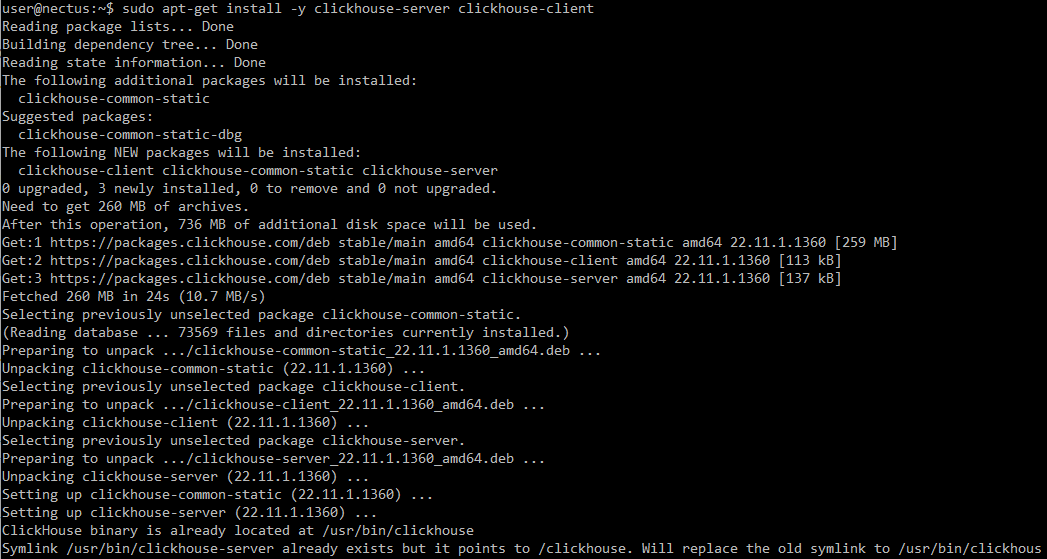
Install ClickHouse:

NOTE: During the installation you will be asked to create a password for default user.

Generate a strong password and save it, it will be used for further configuration.

sudo apt-get update
sudo apt-get install -y clickhouse-server clickhouse-client

Step 5

Start ClickHouse server as a daemon:

sudo service clickhouse-server start

Step 6

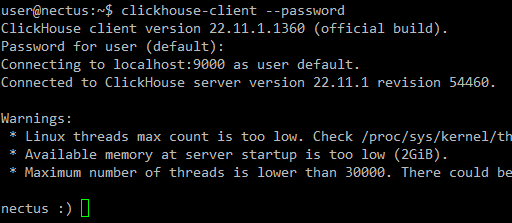
Now after installation it is time to test connection to ClickHouse database.

Start client (use password generated on Step 4):

clickhouse-client –password

NOTE: Use Ctrl+D to exit ClickHouse client.
NOTE: TCP ports 8123 and 9000 must be open

Step 7

NOTE: Use Ctrl+D to exit ClickHouse client.

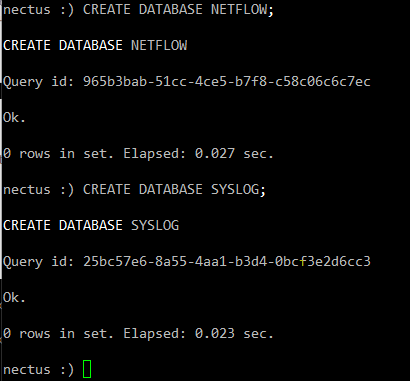
While being connected to the ClickHouse, create required Netflow & Syslog databases:

CREATE DATABASE NETFLOW;
CREATE DATABASE SYSLOG;

ClickHouse Configuration

Step 8

By default, ClickHouse allows inbound connections from localhost only.

To allow connections from remote IP-s

edit /etc/clickhouse-server/config.xml:

sudo vim /etc/clickhouse-server/config.xml

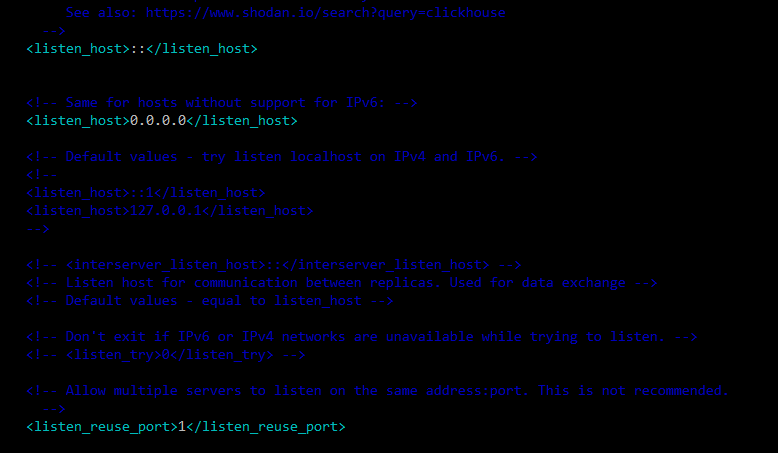
Find <listen_host> parameters (one for IPv6 and one for IPv4) allowing all connections after <logger> section, and uncomment them.

Also uncomment and change to 1 <listen_reuse_port> tag for allowing simultaneous IPv4 and IPv6 interfaces:

<listen_host>::</listen_host>

<!– Same for hosts without support for IPv6: –>
<listen_host>0.0.0.0</listen_host>

<listen_reuse_port>1</listen_reuse_port>

Step 9

Restart ClickHouse to apply new parameters:

sudo service clickhouse-server restart

Step 10

Add internal ClickHouse user “root” for Nectus server to connect to DB.

For that edit users.xml file:

sudo vi /etc/clickhouse-server/users.xml

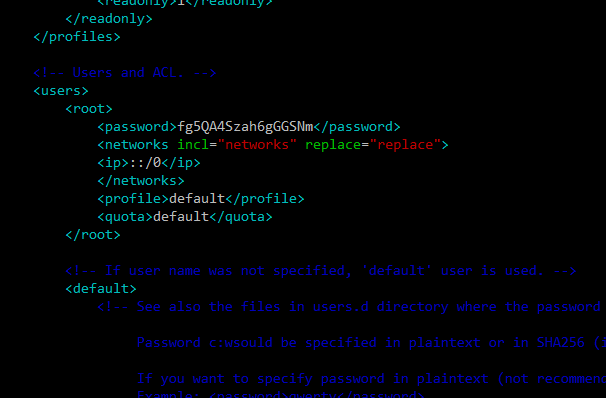
Find <users> section right after <profiles> section.

Add code snippet with user configuration from below, right between </users> and <default> tags, as on a screenshot below.

Generate strong password, replace it in snippet below, and then save file:

<root>
<password>**********</password>
<networks incl=”networks” replace=”replace”>
<ip>::/0</ip>
</networks>
<profile>default</profile>
<quota>default</quota>
</root>

NOTE: If file was overwritten by WinSCP or any other similar tool, verify that file has correct ownership:

sudo chown clickhouse:clickhouse /etc/clickhouse-server/users.xml

Step 11

Restart ClickHouse to apply new user:

sudo service clickhouse-server restart

Step 12

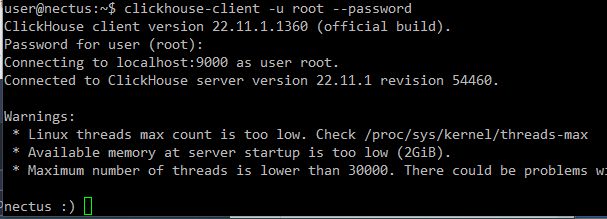
Verify newly created user able to log in:

clickhouse-client -u root –password

Step 13

Disable limit of max database size to drop. By default, ClickHouse doesn’t allow to drop table bigger than 50 Gb to prevent occasional data loss.

NOTE: More info here: https://cloud.yandex.com/en/docs/managed-clickhouse/concepts/settings-list#dbms-cluster-settings

To disable it, edit config file /etc/clickhouse-server/config.xml:

sudo vi /etc/clickhouse-server/config.xml

Find and uncomment line to disable limit of max table size to drop:

<max_table_size_to_drop>0</max_table_size_to_drop>

Restart ClickHouse to apply change:

sudo service clickhouse-server restart

Nectus Configuration

Step 14

We have completed the ClickHouse installation. This last step requires login to Nectus to finish the NetFlow/Syslog integration.

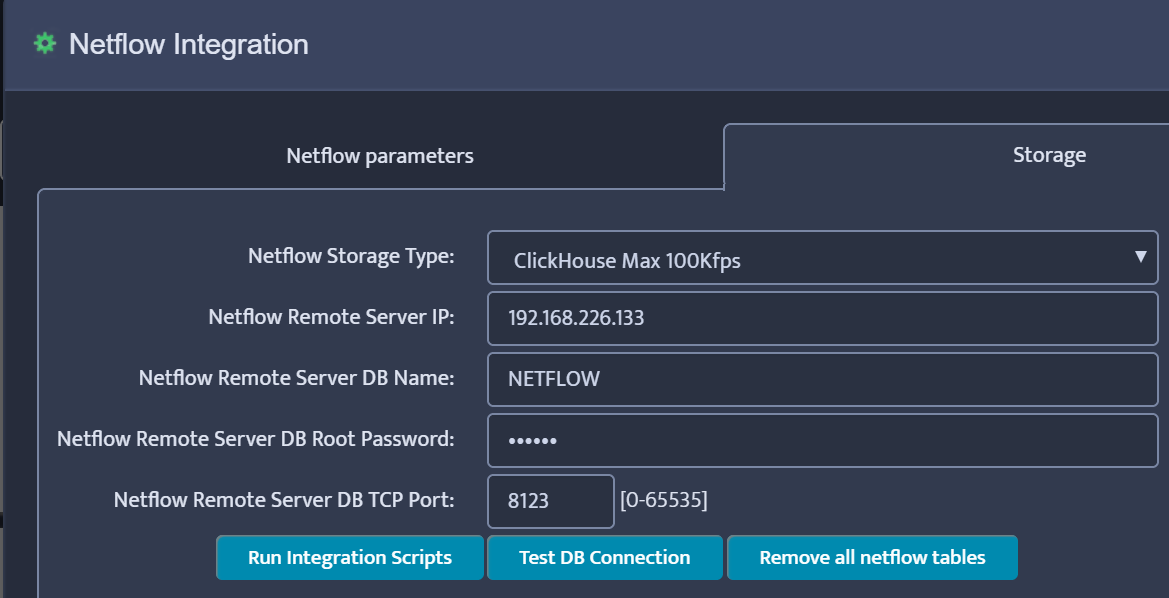
Open to “Nectus Settings -> General Settings -> Netflow Integration” page:

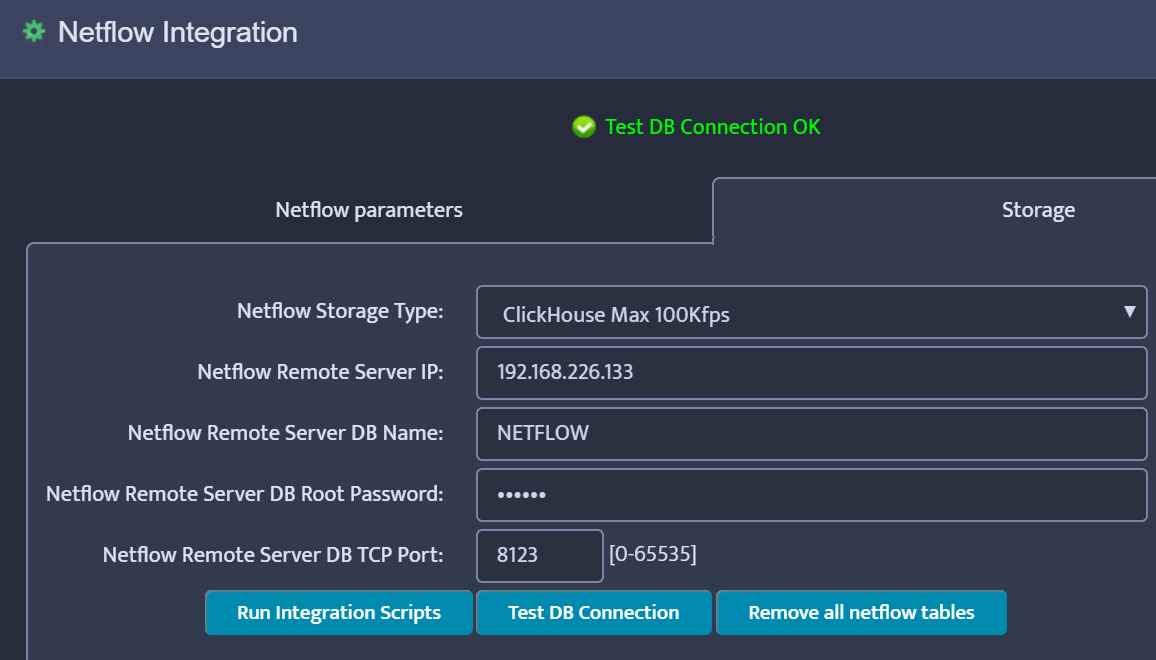
Enter the required information and click Test DB Connection (Remote Server IP is the IP address of the Ubuntu/ClickHouse server). The result should be “Test DB Connection OK”

Click “Run Integration Scripts” and finally Save.

Step 15

Restart Nectus NetFlow and Syslog Services.

Nectus Installation Procedure

,

Nectus Installation Procedure

Server Requirements:   Windows Server 2012 or newer.  8GB of RAM.

1. File Preparation

You start with downloading Nectus Distribution File from www.nectus5.com

Download the ZIP file called Nectus 1.2.51.zip and extract it to a temporary folder.

In the folder you will find two files:


Keep the htdocs.zip file compressed. Start installation by launching file Nectus Setup 1.2.51.exe

2. Nectus Installation

Accept the license agreement on the first page.


Choose an application installation folder.


Choose whether you want Nectus to discover Network devices or not.


If you selected “Yes” for the Network Device Discovery, Specify the version of the SNMP Protocol.


Then specify SNMP credentials.


Specify up to 10 IP Subnets where Nectus will be performing Network Discovery.


Setup an Administrator account.


Then click install, which will automatically complete installation.


When the installation Is complete, you will see the following page.


After you click Finish, the Nectus login page will come up, where you need to provide the credentials of the admin account you created during Installation.


when you log into Nectus you will see a Network Discovery Progress page.


Click “OK” to close it.

3. License Generation

Next, the license page will come up.

If you do not have a permanent license ready, Click “Generate Temporary License” button.


Complete the “Temporary License” Form and press the “Generate Temporary License” button.

Nectus server must have an Internet access to successfully generate the temporary license.

After temporary license is generated, Nectus is fully operational and ready to be used.


Challenges with deploying SNMP v3 based monitoring tools in diverse environments

, ,

One of the biggest challenges with SNMP v3 deployments in diverse environments is a lack of consensus

among hardware manufactures on what set of Privacy Ciphers has to be supported/included in standard SNMP v3 stack.

Even Cisco was unable to unify list of supported v3 Ciphers in different product lines (ASA vs NX-OS vs IOS-XR).

Partially this was caused by the lack of RFC that defined AES-192 and AES-256 implementations  for SNMP v3 but this didn’t stop top-tier hardware

vendors from implementing  those Ciphers internally and partially it was  caused by slow v3 adoption rate that put very low pressure on hardware vendors.

In any case it is very unlikely that you will be able to pick single set of  SNMP v3 Authentication/Encryption parameters that will be supported on all of the devices

in a good sized enterprise network. This results in having to use and support different encryption ciphers in different devices and what most important this

will require your Network monitoring tool to support multiple SNMP profiles based on device type. Your monitoring tool has to discover what SNMP profile

is compatible with each device, “remember” it and only use compatible SNMP parameters when communicating with specific device.

Nectus is the only tool that was built from ground up with support for device specific SNMP profiles and it deploys patented discovery logic that allows it to match

compatible SNMP profile to each device in sub-seconds. Nectus supports up to 1000 SNMP profiles and used by multiple customers with 10K+ routers.

60 days Nectus Trial