ClickHouse DB Installation for Nectus Netflow & Syslog Storage
Requirements: Operating System: Ubuntu 22.04.1 LTS RAM: 16GB vCPU: 2
More information about installation: https://clickhouse.com/docs/en/install/#self-managed-install
Step 1
Open terminal and install required packages:
sudo apt-get update
sudo apt-get install -y apt-transport-https ca-certificates dirmngr
Step 2
Import the ClickHouse public key:
sudo apt-key adv –keyserver hkp://keyserver.ubuntu.com:80 –recv 8919F6BD2B48D754

NOTE: It is recommended to import the public key if it’s a fresh Ubuntu install.
Otherwise, you may get the following error when adding the repository:
GPG error: http://repo.clickhouse.com/deb/stable/main/release:
The following signatures couldn’t be verified because the public key is not available:
NO_PUBKEY 8919F6BD2B48D754
Step 3
Add ClickHouse repository:
echo “deb https://packages.clickhouse.com/deb stable main” | sudo tee \
/etc/apt/sources.list.d/clickhouse.list

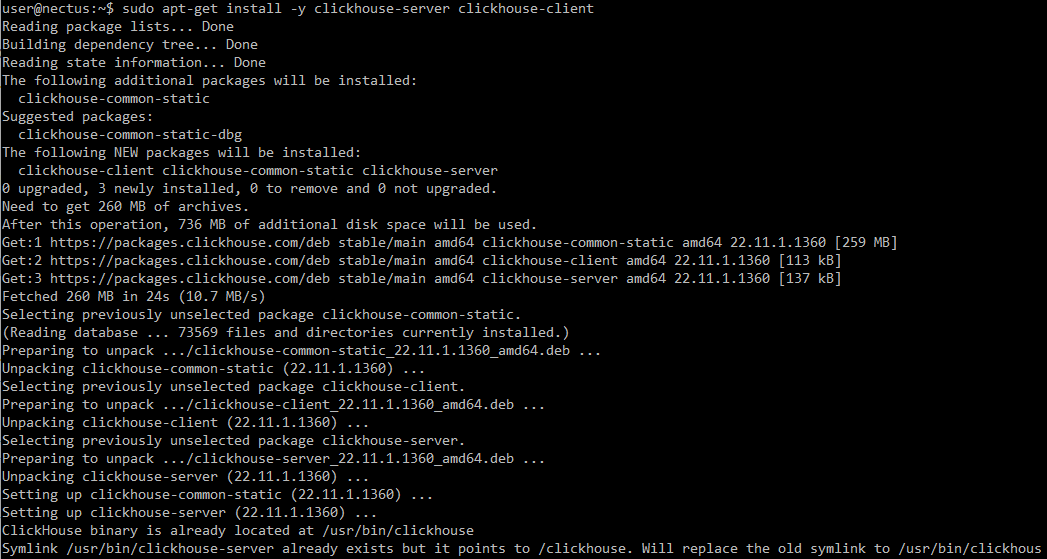
Step 4
Install ClickHouse:
NOTE: During the installation you will be asked to create a password for default user.
Generate a strong password and save it, it will be used for further configuration.
sudo apt-get update
sudo apt-get install -y clickhouse-server clickhouse-client
Step 5
Start ClickHouse server as a daemon:
sudo service clickhouse-server start

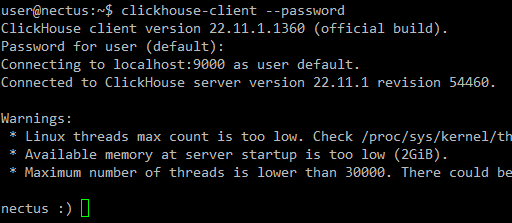
Step 6
Now after installation it is time to test connection to ClickHouse database.
Start client (use password generated on Step 4):
clickhouse-client –password
NOTE: Use Ctrl+D to exit ClickHouse client.
NOTE: TCP ports 8123 and 9000 must be open
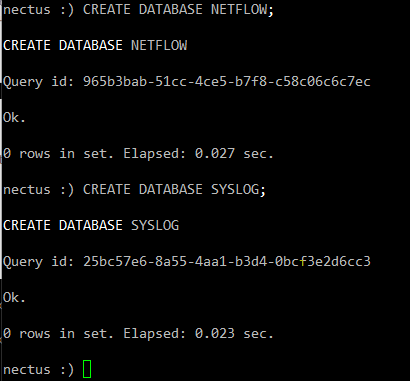
Step 7
NOTE: Use Ctrl+D to exit ClickHouse client.
While being connected to the ClickHouse, create required Netflow & Syslog databases:
CREATE DATABASE NETFLOW;
CREATE DATABASE SYSLOG;
ClickHouse Configuration
Step 8
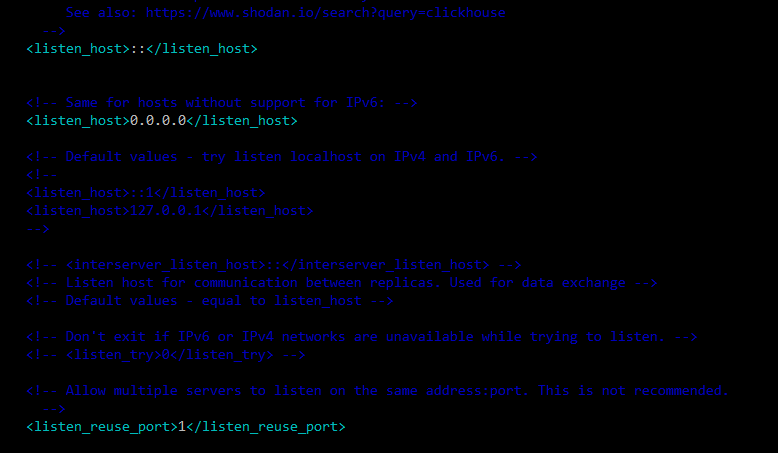
By default, ClickHouse allows inbound connections from localhost only.
To allow connections from remote IP-s
edit /etc/clickhouse-server/config.xml:
sudo vim /etc/clickhouse-server/config.xml
Find <listen_host> parameters (one for IPv6 and one for IPv4) allowing all connections after <logger> section, and uncomment them.
Also uncomment and change to 1 <listen_reuse_port> tag for allowing simultaneous IPv4 and IPv6 interfaces:
<listen_host>::</listen_host>
<!– Same for hosts without support for IPv6: –>
<listen_host>0.0.0.0</listen_host>
<listen_reuse_port>1</listen_reuse_port>
Step 9
Restart ClickHouse to apply new parameters:
sudo service clickhouse-server restart
![]()
Step 10
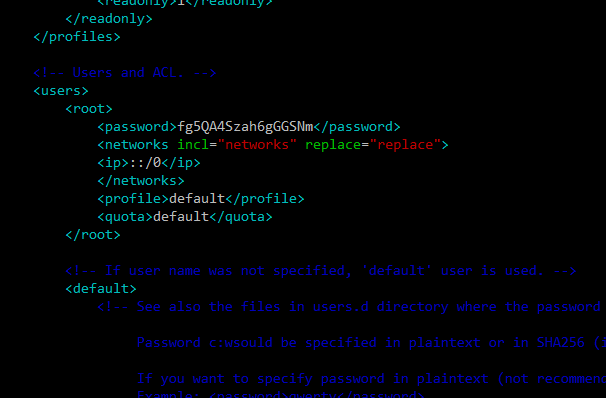
Add internal ClickHouse user “root” for Nectus server to connect to DB.
For that edit users.xml file:
sudo vi /etc/clickhouse-server/users.xml
Find <users> section right after <profiles> section.
Add code snippet with user configuration from below, right between </users> and <default> tags, as on a screenshot below.
Generate strong password, replace it in snippet below, and then save file:
<root>
<password>**********</password>
<networks incl=”networks” replace=”replace”>
<ip>::/0</ip>
</networks>
<profile>default</profile>
<quota>default</quota>
</root>
NOTE: If file was overwritten by WinSCP or any other similar tool, verify that file has correct ownership:
sudo chown clickhouse:clickhouse /etc/clickhouse-server/users.xml
Step 11
Restart ClickHouse to apply new user:
sudo service clickhouse-server restart
![]()
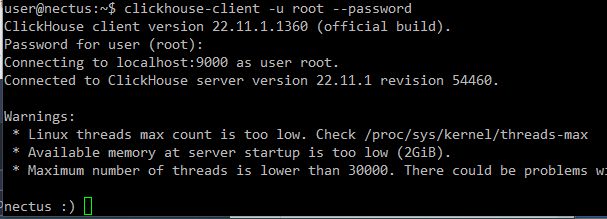
Step 12
Verify newly created user able to log in:
clickhouse-client -u root –password
Step 13
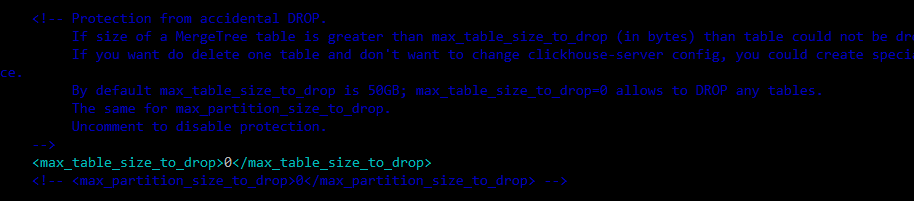
Disable limit of max database size to drop. By default, ClickHouse doesn’t allow to drop table bigger than 50 Gb to prevent occasional data loss.
NOTE: More info here: https://cloud.yandex.com/en/docs/managed-clickhouse/concepts/settings-list#dbms-cluster-settings
To disable it, edit config file /etc/clickhouse-server/config.xml:
sudo vi /etc/clickhouse-server/config.xml
Find and uncomment line to disable limit of max table size to drop:
<max_table_size_to_drop>0</max_table_size_to_drop>
Restart ClickHouse to apply change:
sudo service clickhouse-server restart
Nectus Configuration
Step 14
We have completed the ClickHouse installation. This last step requires login to Nectus to finish the NetFlow/Syslog integration.
Open to “Nectus Settings -> General Settings -> Netflow Integration” page:
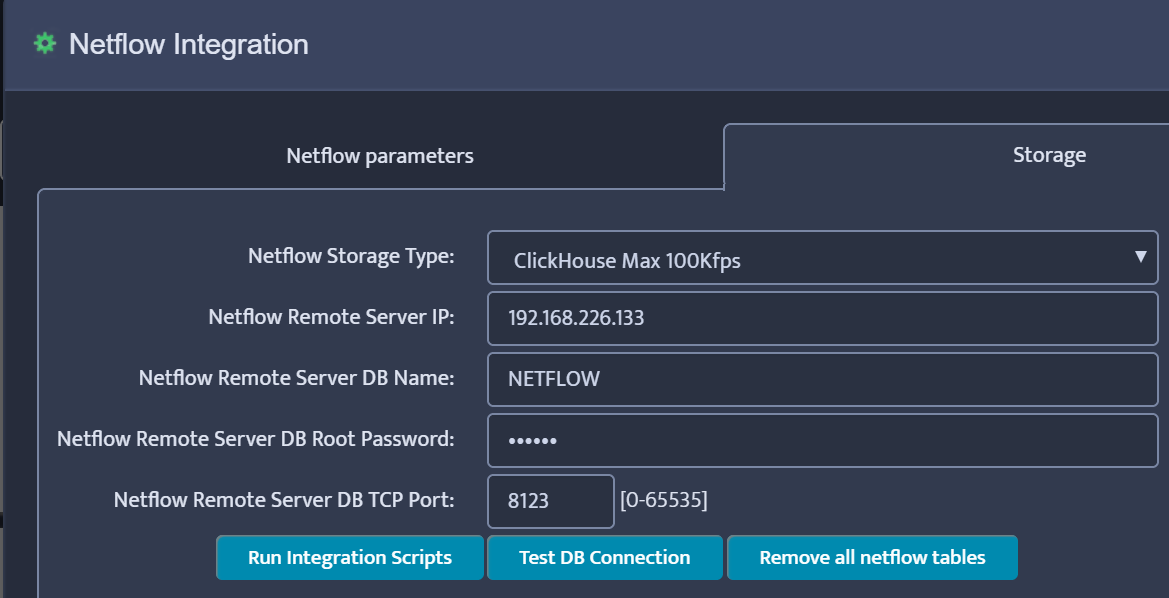
Enter the required information and click Test DB Connection (Remote Server IP is the IP address of the Ubuntu/ClickHouse server). The result should be “Test DB Connection OK”
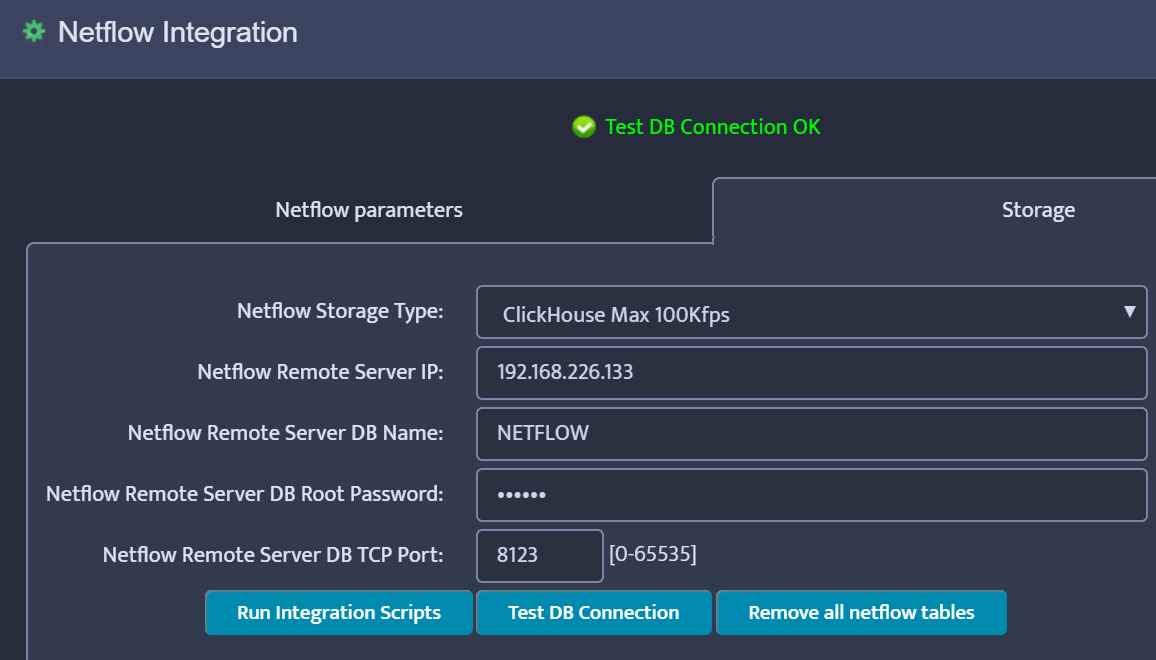
Click “Run Integration Scripts” and finally Save.
Step 15
Restart Nectus NetFlow and Syslog Services.